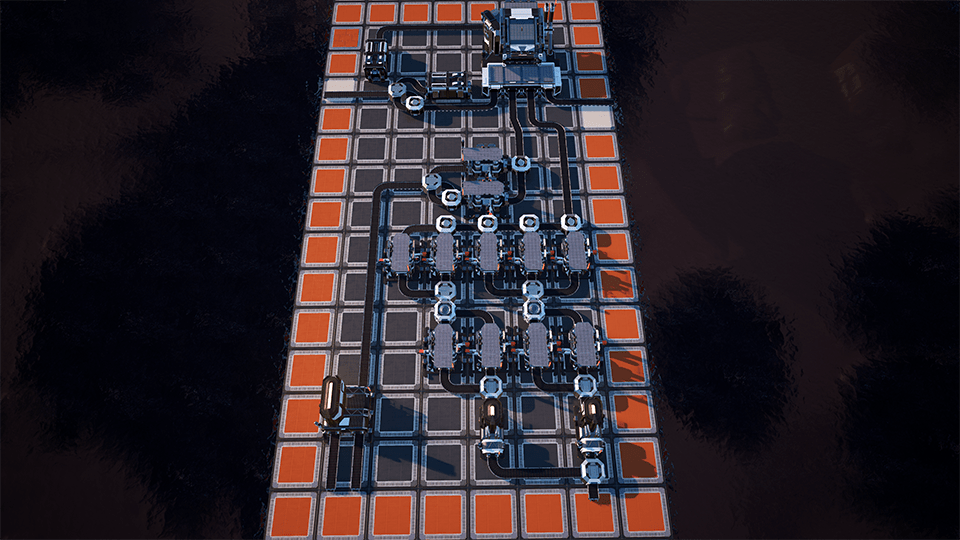
Heavy Modular Frame Super-Efficient Factory Layout
EpicSteamEAEX BeginnerRectangleMixed72 foundations
This guide brings together two previous layouts, encased industrial beams and modular frames along with this build to produce a total of two heavy modular frames per minute.
TotalXclipse 77039 2020-10-11
In order to build this factory layout you will need the following requirements:
- 45 Coal
- 95 Iron ore
- 1 Manufacturer
- 11 Constructors
- 2 Smelters
- 1 Foundry
- Previous Encased Industrial Beam Layout
- Previous Modular Frame Layout
- 119 Mw
Video Guide:
Heavy Modular Frames - Super-Efficient Build Guide
Part 1 - Smelter Placement
To start off, place a splitter in the centre of the first row in the sixth column with the outputs flowing ahead and to the left. Now place a smelter directly in-front of the splitter as well as a second smelter in the same position in the fourth column. Both smelters should be set to iron ingots, with the left smelter set to 67% clock speed producing 20 iron ingots per minute. The smelter on the right is set to 100% clock-speed.
Make sure the bus leading to the smelters has at least 50 iron ore on the line per minute.
In-front of both the smelters spanning the second and third row of foundations, place splitters, flowing forwards.

Part 2 – Rod Constructor Placement
Directly in-front of the splitters place a constructor, you will also want to place two more constructors directly to the left of each of these constructors, you should now have four constructors in a row. Next, set all off these to iron rods and connect the conveyors up. The two constructors on the left-hand side of the layout should be set to 67% clock-speed so that these 4 constructors will produce a total of 50 iron rods per minute.
In front of the left constructor of each smelter, place a merger flowing forwards and directly in-front of each merger place another splitter. You should now have a layout like the one in the photo below.

Part 3 – Screw Constructor Placement
Here we need to place five constructors in a row to produce screws. Place them in-line starting directly in-front of the splitters. The splitter on the right-hand side should be connected to three constructors (one in-front and one to each side) The splitter on the left will be connected to two constructors. Once placed, set all constructors to screws. Next merge all screw constructors into one Mk3 conveyor manifold flowing to the right with the final merger in the line flowing forwards.

Part 4 – Steel Foundry
Place a foundry flowing forwards in the second row of the first column. Set this foundry to steel. The inputs on this foundry should be at least 45 iron ore, and 45 coal per minute.

Part 5 – Steel Pipe Constructor Placement
Now place two steel pipe constructors, the first constructor should be placed horizontally spanning the fourth column, directly in-front of the screw line mergers. Then place the second steel pipe constructor horizontally above the first constructor.
We will now run a single conveyor from the output of the foundry to the border of the seventh and eighth row in the first column.

Now we shall create a 2:1 load balancer, place a merger flowing into the first constructor, then diagonally from the merger place a splitter, we will connect the front and right-hand side output to the merger and we shall run the left-hand output to the second constructor. (see photo below)
Now connect the steel ingot line with the splitter. The first constructor will run at 100% clock speed producing steel pipes and the second constructor, steel pipes at 50% clock-speed, afterwards merge these two constructors together in-front of the second constructor.

Part 6 – The Manufacturer
To place the manufacturer, place a merger directly against the far edge of the grid in the middle of the penultimate column, then place the manufacturer directly against the merger, you can delete the merger afterwards.
You can now connect the steel pipes and screws however you prefer to the manufacturer; I use the two middle inputs as I will have the encased industrial beams and the modular frames coming from factories located at the side.

Next bring the modular frames from our last build straight to the manufacturer in the right-hand input. Note that we will not need to adjust this line as we will have the required ratio of modular frames being produced per minute.
Our last input will bring the 15 encased industrial beams that we discussed in the previous guide to the factory. Do note that we only need ten encased industrial beams per minute so I suggest using the 2:1 split we did for the steel pipes, with two of the three splitter lines merging the beams into one line for the manufacturer and a single line feeding a container the remaining beams. These will come in handy for Mk4 conveyor belts or even manufacturing later down the line.
With this done the last thing necessary is to select heavy modular frames on the manufacturer and send the output to a storage area or to another manufacturing area.
I will stress that this guide is part of the efficiency build guide series and a lot of people have asked for builds that produce more items per minute. This layout should give you the basic layout of a functioning factoryfor manufacturing heavy modular frames, from here should you wish, you can extend on the factory to allow for higher production targets per minute.

We’re very proud to have launched this website and hope you have found the guide both helpful and enjoyable.We look forward to updating the site weekly with new guides and layouts.
If you have a particular layout or guide you’d be interested in sharing with the community, we’d gladly giveyou the chance to be an author on our site, get in touch with us.